
The PTC-IInet is a clever combination of a PACTOR modem and an embedded Linux PC.
The Linux section of the PTC-IInet is based on µClinux. For interested users we provide patches against µClinux and the complete source code of the web interface for download at the SCS Homepage.
All Linux source code devoloped by SCS was released under the GNU GPL.
Changes of the µClinux kernel and the web interface are documented in the CHANGELOG.
BUGS informs about bugs and things to do.
The PTC-IInet is very similar to the PTC-IIusb. So please have a look at the PTC-IIusb manual too.
After power on two things happen:
Now the PTC-IInet is ready to operate.
The web interface is mainly selfexplaining. For every item an online help is available. Simply click on the label of the element you need help for.
The web interface of the PTC-IInet can be reached by entering its IP address as URL into your web browser, e.g. http://192.168.0.100. As username enter "root", as password "PTC2net". Please change the password immediatly after the login!
The web interface of the PTC-IInet needs JavaScript!
We test the web interface with: KDE Konqueror, FireFox (Linux/Windows), Opera (Windows), Internet Explorer (XP).
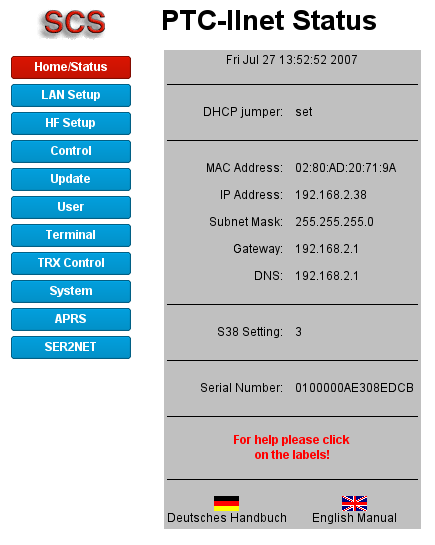
After successful log in the first thing you see is the status screen. The following is displayed:
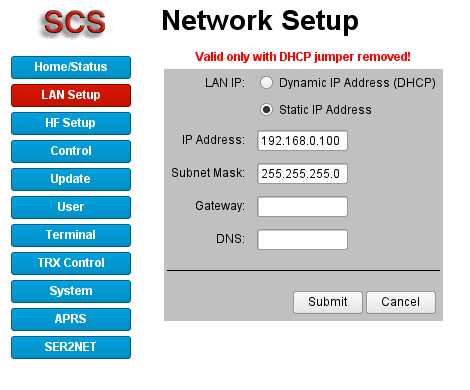
Here all network specific settings are entered.
All settings are only valid if the DHCP jumper is not set!
The PTC-IInet is delivered with the DHCP jumper set, which means that the PTC-IInet tries to obtain its IP address from a DHCP server. With the DHCP jumper set there is no fall back to fixed IP addresses if there is no DHCP server found.
Without the DHCP jumper and activated DHCP there is a timeout: if the PTC-IInet doesn't find a DHCP server within 60 seconds it will use the fixed IP addresses.
If you don't have a DHCP server in your network, you need to configure the PTC-IInet to a fix IP address. This is done by removing the DHCP jumper inside the unit, which is located close to the power-connector. The IP address is then pre-configured to 192.168.0.100, Netmask 255.255.255.0.
If a fixed IP address is used, you always need to enter a standard gateway as well as a DNS server to have a successful Internet connection.
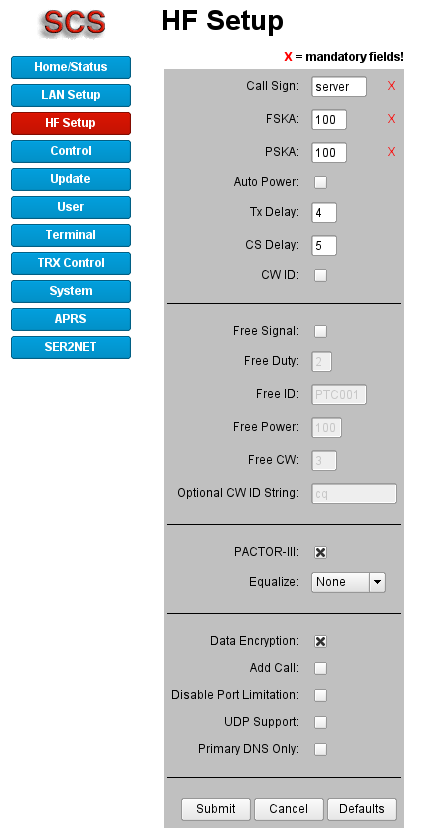
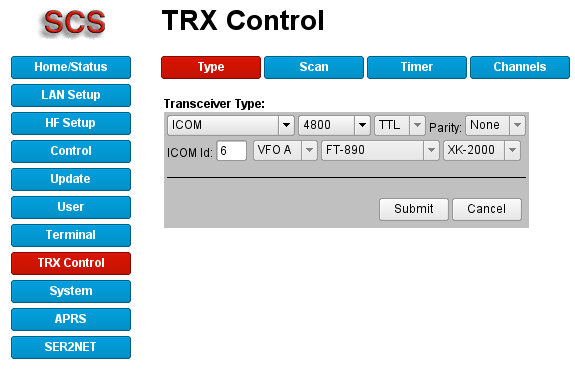
Here the most important parameters for the radio/modem side are entered.
Call Sign is the callsign of the PTC-IInet.
FSKA and PSKA are the audio output levels of the PTC-IInet for the various operation modes. The two values are extremely important to achieve distortion free operation on the HF bands and depend on the transceiver that is used. The best way to evaluate the correct setting is to use a normal PTC-IIxxx model, because the web interface of the PTC-IInet does not provide sufficient support of this item yet. The exact procedure is described in the manuals of the PTC-IIxxx in the chapter "Installation".
Tx Delay can usually be left at default value (4).
The remaining settings are described in detail in the document Manual for the Professional Firmware.
From the settings made here the so-called "init-string" is assembled.
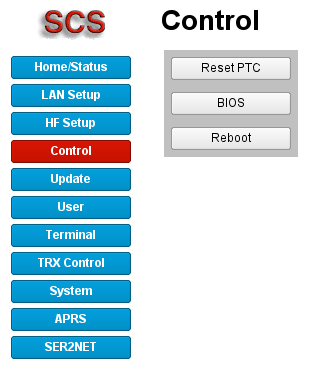
Reset PTC - resets the modem part of the PTC-IInet.
BIOS - switches the modem part into the BIOS.
Reboot - boots the Linux controller.
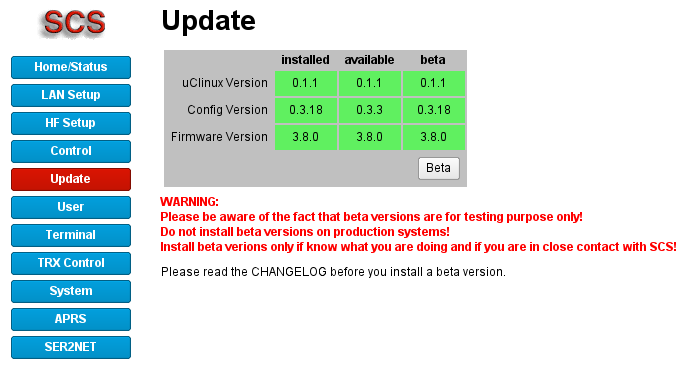
The Update function of the PTC-IInet compares the current installed versions with the versions available on the SCS server. This requires a fully working internet connection for the update procedure!
The column installed shows the versions as currently installed on the PTC-IInet, the column available shows the versions available on the SCS server.
If there are newer versions on the SCS server, then the corresponding line is marked with red colour and under the list an Update button is displayed, which can be used to finally start the update procedure.
The update can take several minutes! So please be patient.
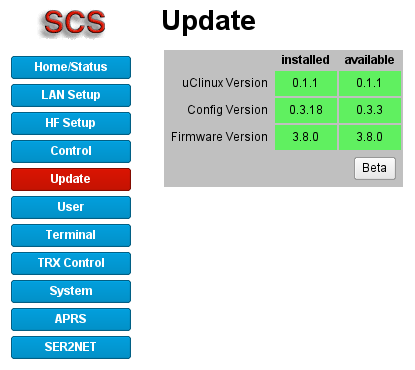
Click on the Beta button to show all available beta versions.
Please read the warning message very carefully!
To prevent every average PTC-II owner to use the HF-Internet-Gateway, every user needs to login with his user name and password. Username and password need to be entered as follows.
Avoid spaces in username and password!
Username und password are case sensitive!
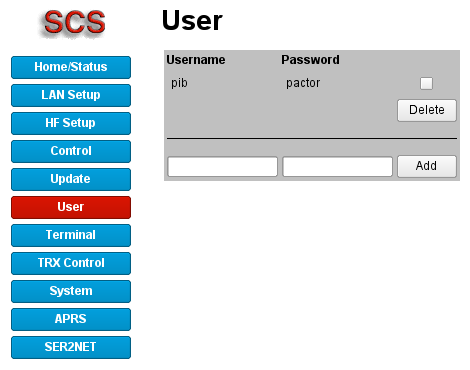
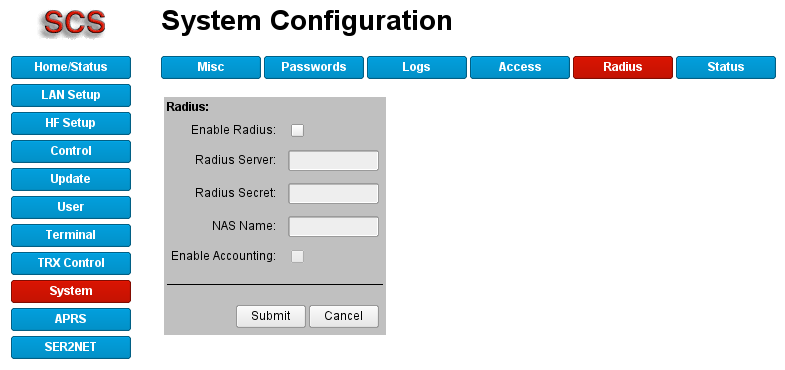
User authentication can also be done with RADIUS. See the RADIUS configuration in the System menu.
With the Web-Terminal you gain access to the modem part of the unit (the real PACTOR controller).
First you have to start the Web-Terminal. Simply click on the Start Terminal button.
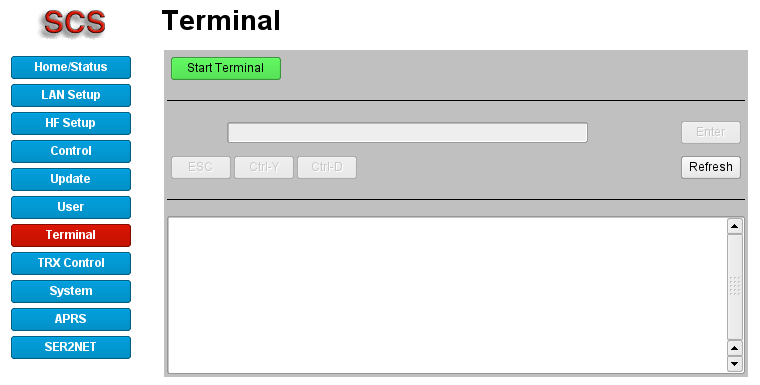
If the Web-Terminal starts successfully additional buttons will be activated and the PTC shows the well known cmd:.
With the buttons ESC, Ctrl-Y and Ctrl-D you can send the respective control characters to the PTC.
Please click on the Stop Terminal butten when you're finished using the Web-Terminal.

At the moment the Web-Terminal has one drawback: the receiving window scrolls only with FireFox or Internet Explorer! By the way: you should use the Web-Terminal for debugging purposes only!
If you're not yet familiar with the excessive possibilities of the transceiver control system then we suggest that you first read chapter TRX of the PTC-IIusb manual.
In this first dialog the transceiver type and the resulting parameters are defined.
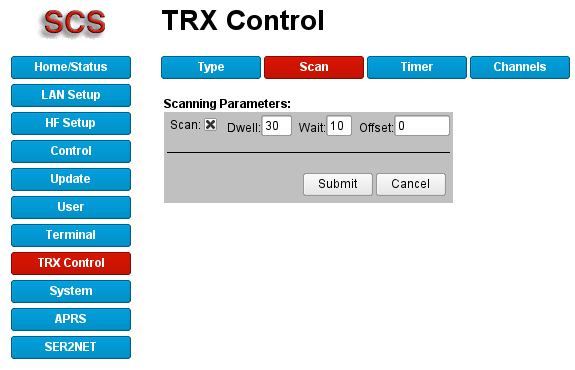
Here you can start the real scanning process.
Dwell definies the dwell time of the scanner in 100 ms steps. With a value of 30 the scanner stays for exactly 3 seconds on each channel.
Wait defines the time in seconds the scanner stays on the current channel after the end of a connection.
Offset defines a frequency offset which is applied to every frequency from the channel list.
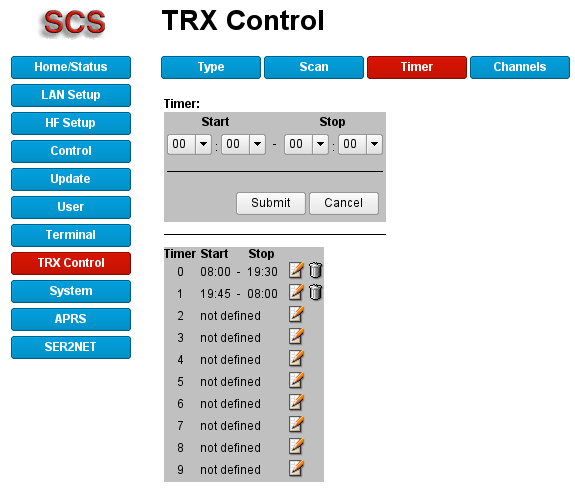
Here the time slots are configured for the timer controlled scanning. Up to 10 time slots can be defined.
A new time slot is defined by simply setting a start- and stop time and clicking the submit button. The new time slot is inserted at the first free place.
Click on ![]() to edit a timer.
to edit a timer.
Click on ![]() to delete a timer.
to delete a timer.
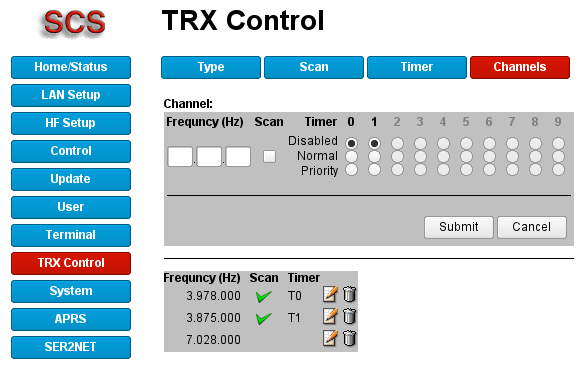
Here the frequency list is generated. Up to 32 channels are possible.
With Scan you enable the channel to be used for a prospected scanning. If time slots are defined you can restrict scanning to the selected time slots only.
Click on ![]() to edit a channel.
to edit a channel.
Click on ![]() to delete a channel.
to delete a channel.
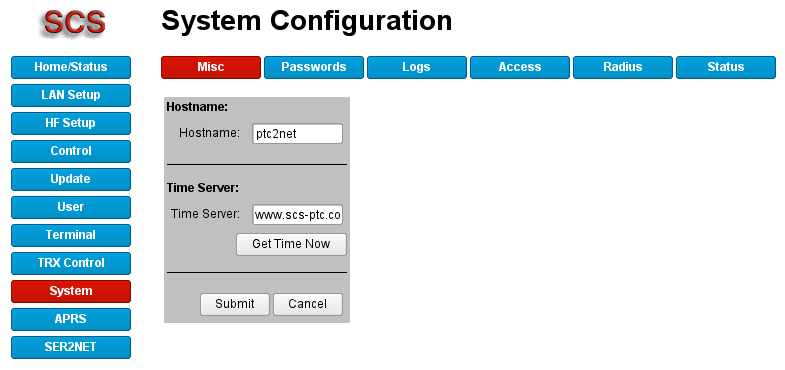
Define the hostname of the PTC-IInet.
The PTC-IInet can obtain date and time from an Internet time server.
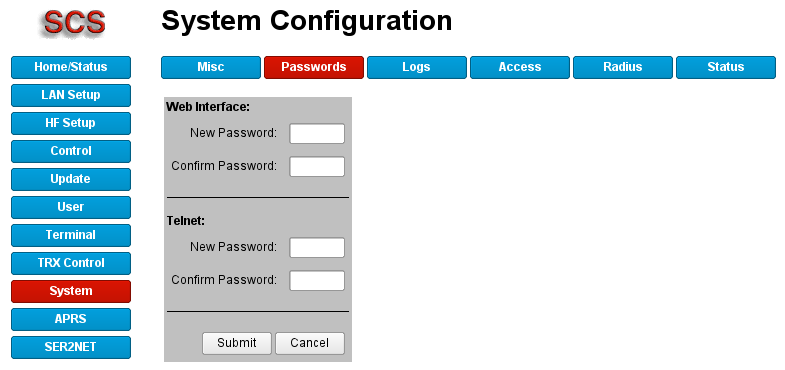
Change the passwords for the web interface and telnet.
Passwords are case-sensitive ("A" is a different character than "a") and must be between 5 and 8 characters in length.
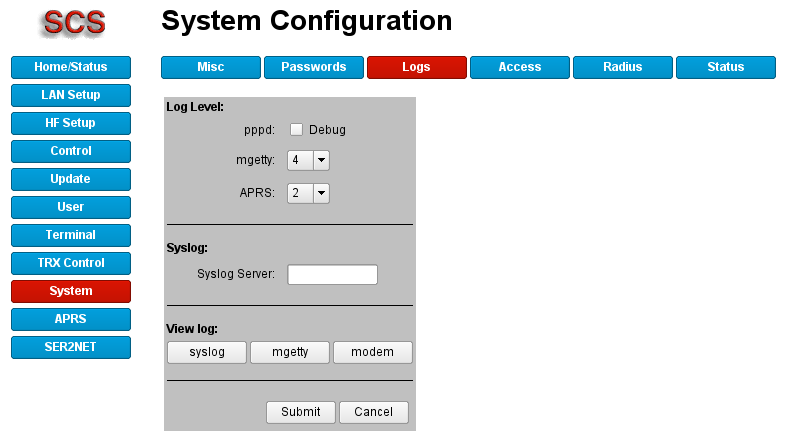
For debugging the PTC-IInet generates two log files. The main system log, the so-called Syslog and the log of the mgetty process.
If you check PPPD Debug, the ppp daemon logs all details of the ppp link establishment.
With mgetty you can choose between 7 levels. Level 0 means no logging (or logging of only fatal error messages). Level 4 is a good compromise for debugging. Level 6 is really verbose.
The log files are kept in RAM and therefore cleared at power up and reboot.
Therfore you can forward the Syslog to a distant computer, the Syslog server.
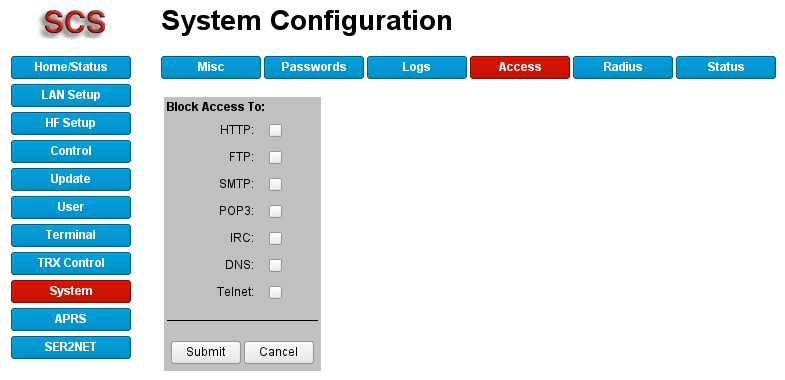
For special applications it can be necessary to block some internet protocols.
E.g. if you check HTTP users can not browse the web.
RADIUS (Remote Authentication Dial-In User Service) is a protocol to perform user authentication utilizing a central data base. This is really useful if you build a network with more than one PTC-IInet.
For special applications the PTC-IInet provides detailed status information via UDP.
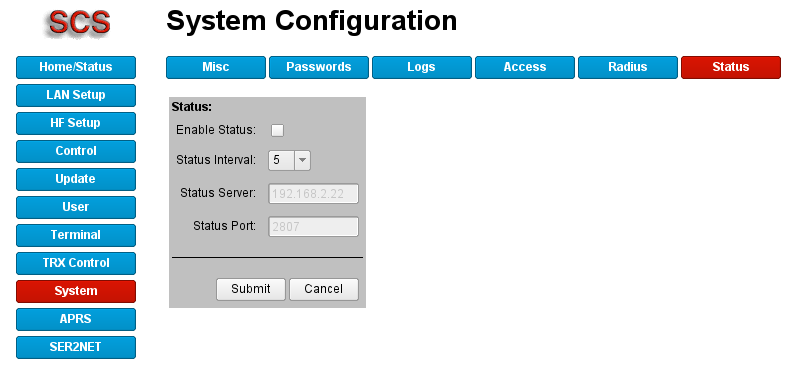
First you have to "Enable Status".With the field "Status Interval" you define the time between the status reports in seconds. Set the destination address and port with "Status Server" and "Status Port".
UDP status datagram format:
The very first byte defines the UDP status type.
All multi byte values uses MSB first!
Status type 0 datagrams contain the PACTOR status and some other low layer information.
| Offset | Contents |
|---|---|
| 0: | Type identifier (always 0) |
| 1: | PACTOR Status Byte |
| 2: | PACTOR level 0=not connected, 1=PACTOR-I, 2=PACTOR-II, 3=PACTOR-III |
| 3: | PACTOR speed level 0-5 |
| 4,5: | Number of bytes currently waiting in the PACTOR transmit buffer. |
| 6: | Occupation of the PACTOR transmit buffer in percent. This value depends on the speed level and thus may vary rapidly. |
| 7-10: | Number of bytes (incl. overhead) already transfered to the PACTOR transmit buffer during entire session. |
| 11-14: | Number of bytes (incl. overhead) already received to the PACTOR receive buffer during entire session. |
| 15,16: | Receive frequency offset in Hertz On PACTOR-I-PACTOR-III the range is limited to -127...+127 Hz. The value -128 represents the state " no frequency information available". |
Status type 1 datagrams contain high priority status information from the REMOTE modem.
| Offset | Contents |
|---|---|
| 0: | Type identifier (always 1) |
| 1: | Remote Status Information 0=reserved 1=PAP not acknowledged (PAP NACK) As the PIB only uses PAP, this means that the authentication on the remote side failed. This status can only appear on the client side. Usually the link will be terminated by the host PC a few seconds after PAP NACK status was reported to the client PC via UDP status datagram. 2...255=reserved |
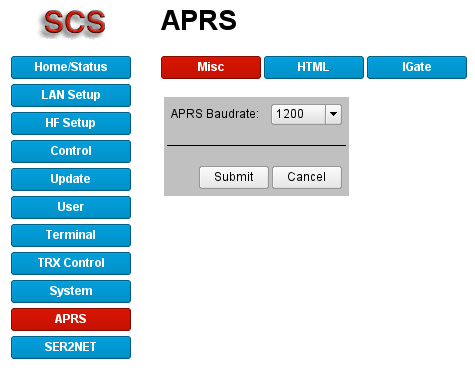
APRS, the Automatic Position Reporting System, is a protocol to transfer position data of moving and fixed objects.
To receive APRS with the PTC-IInet you have to specify the (radio-) baudrate. Save your settings with "Submit".
One way to process the data is to send the data as input to a HTML form. For that you have to enter the URL of the server to which the position data shall be forwarded for further processing and which kind of data shall be forwarded. Then save your settings with "Submit".
To finally start the APRS receiption, just click on the "Start APRS" button.
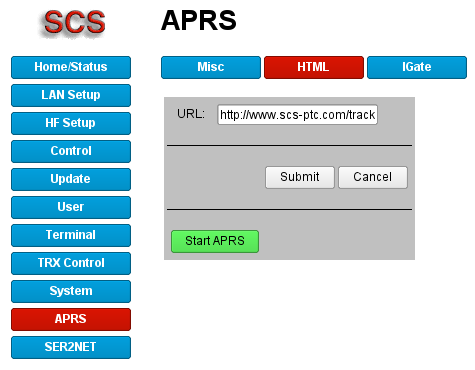
The PTC-IInet now enters the APRS mode. All other funktions are disabled!
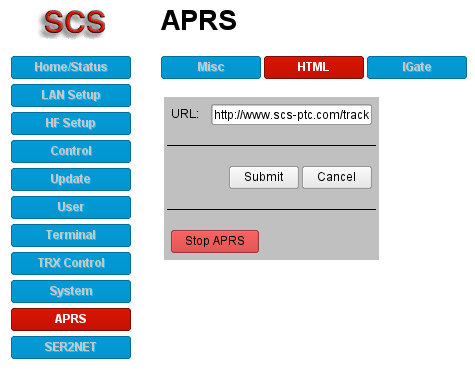
Received position data are passed on simply as HTML form inputs to the server indicated in the URL input field. For that you also need to specify the name of the script that shall process the data, as well as the parametes to be processed. This is given behind the URL in the entry field, so that a possible URL entry field may look as the following example:
http://www.myurl.localnet/setpos.php?src=$SOURCE&lat=$LATITUDE&lon=$LONGITUDE
Here the parametes Call, Longitude and Latitude are passed along to a PHP script with the name setpos.php. The script expects the parameter in the variables src, lat and lon. The expressions $SOURCE, $LATITUDE and $LONGITUDE are substituted by the actual values before they get transmitted. Generally the format for the URL entry field is formatted as follows: http://my_server_url/script_name?script_variable=$_expression&script_variable=$_expression&...
Hereby is
| my_server_url | the URL of the server where the PTC-IInet shall sent the positionsdata to |
| script_name | the name of the CGI/PHP script which receives and processes the position data on the server |
| script_variable | name of the variable the CGI/PHP script expects |
| $_expression | one of the PTC-IInet variables |
For better readability the PTC-IInet provides the following variables. They are substituted by the actual values before the position data gets transmitted to the server:
| Variable | Bedeutung |
|---|---|
| $SOURCE | Source Call Sign |
| $LATITUDE | Latitude |
| $LONGITUDE | Longitude |
| $ALTITUDE | Altitude |
| $SPEED | Speed |
| $COURSE | Course |
| $SYMBOL_TABLE | Symbol Table |
| $SYMBOL_CODE | Symbol Code |
| $COMMENT | Comment |
Certainly it does not necessarily need to be a PHP script. Generally every CGI script in Perl, Python or C can do the job too. It just needs to be able to process the data respectively.
What the CGI-script is finally doing with the position data received just depends on your dedicated application!
As an example we provide a small application which saves all received position data in a MySQL database and displays the positions in a map using Google Maps. You can download this small demo application directly from the SCS home page. To use this application you need access to a web server with PHP and MySQL installed. For the installation please have a look at the README file!
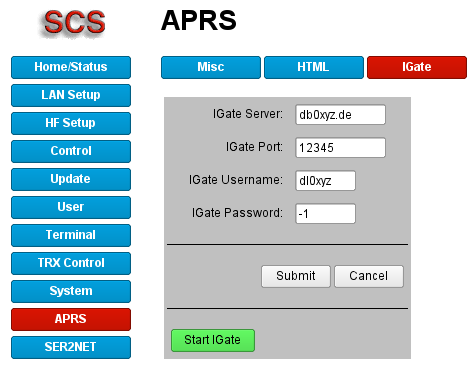
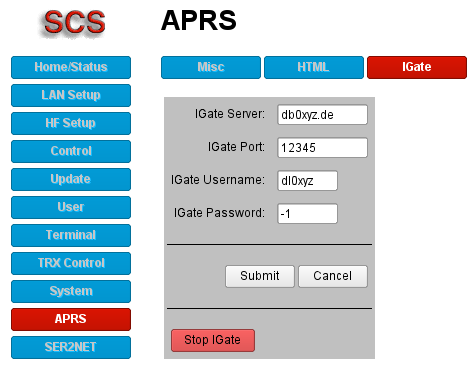
The PTC-IInet can act as IGate, transfering all received position data to an APRS internet server. The name or IP address and the target port of the APRS server has to be specified in this case. Further, you need a user name as well as a password, so as to make the APRS server accept the data. The user name normally is the own call sign. If you do not have a password for the APRS server, just enter -1 in the password field. This way, the APRS server only accepts position data received from the stored "IGate Username". To pass third party traffic to the APRS server you have to use a valid password obtained from the operator of the APRS server. Save your settings with "Submit".
To finally start the IGate, just click on the "Start IGate" button.
The PTC-IInet now enters the IGate mode. All other funktions are disabled!
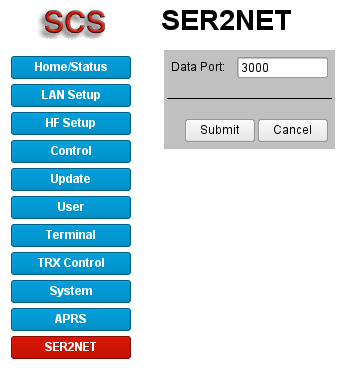
SER2NET provides access to the internal serial port between the PACTOR modem and the Linux PC of the PTC-IInet via TCP/IP. Using a virtual COM port driver, you can get into the modem part of the PTC-IInet from any PC in the network, as if the PACTOR modem would be directly connected to the respective PC. That's the theory. In fact, programs requiring an exact timing on the serial port will not work, since passing on the data over TCP/IP always causes a delay.
Of course you can also control the PACTOR modem of the PTC-IInet from remote locations this way using the internet, if a corresponding port forwarding is set in the router. However, this includes a high risk, as the connection is not password protected. Therefore, everybody who knows your IP address and the correct port can control your PTC and - for example - switch it on air.
As driver for the virtual COM port we recommend HW Virtual Serial Port from HW-group
![]() .
.
The installation is self explaining.
After starting "HW Virtual serial Port" you have to enter various settings. The field "IP Addess" requires the IP address of your PTC-IInet, the field "Port" defines the "Data Port" of the PTC-IInet and "Port Name" characterizes the COM port generated by "HW Virtual serial Port".
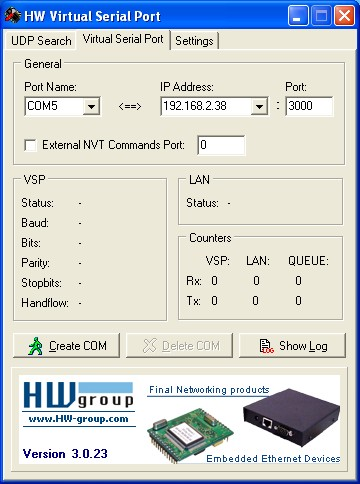
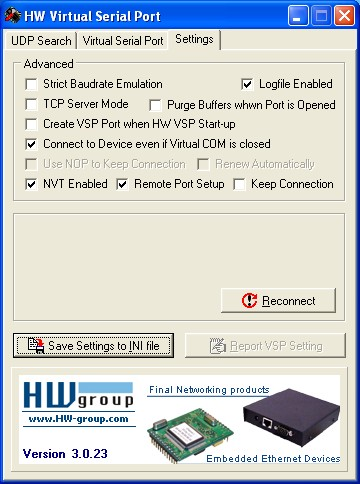
Select the tab "Settings" and check the settings. The screen shot shows the recommended settings (which are the defaults).
Now return to the "Virtual Serial Port" tab and click the button "Create COM". "HW Virtual serial Port" now creates the COM port and connects it via TCP/IP with the PTC-IInet.
You can test the function with the Windows Hyperterminal for example.
Use 115200 baud as baudrate. Other baudrates are not supported!
Besides the web interface the PTC-IInet provides Telnet access. Username is "root", the default password is "PTC2net".
After successful login you can use most of the usual Linux commands.
Netid is an easy way to detect any PTC-IInet on your local network.
The "PTC-IInet information daemon" (netid) listens on port 1101 for an UDP broadcast packet. When it receives a valid query packet it sends back an info packet.
The packet format and example software written in C is available upon request.